


Things you will learn;
Build Inventory API with Node JS,
Authentication and Authorization in Node JS,
How to Dockerize a Node JS APP,
How to push a docker image to docker Hub,
Setting up Node JS(Unit-Inventory) Application.
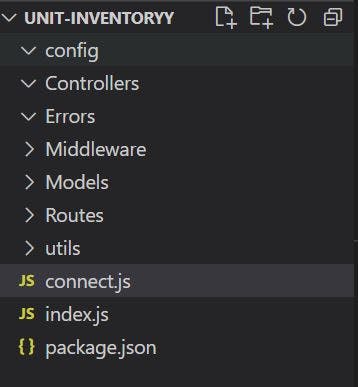
Create a folder on your local machine with the name Unit-Inventory and bring it into your personal IDE i.e VS-CODE etc. Open your IDE terminal and cd into the path of the folder.

On the terminal run the cmd npm init --y, this will create your package.json file.
At the root of the application folder, create the following folders and files:
Config, Controllers, Errors, Middleware, Models, Routes, utils
connect.js, index.js , .env
Express JS will be used for this application, which is a Node JS framework..
Install the following packages and dependencies that will be utilized for this application. Open your terminal and npm install the following, express, bcryptjs, cors, dotenv, express-async-errors, express-mongo-sanitize, express-rate-limit, helmet, http-status-codes, jsonwebtoken, mongoose, morgan, nodemon, uuid, xss-clean .
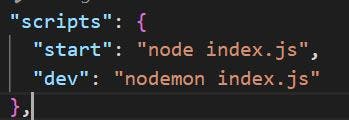
In your package.json file, adjust the scripts key to the image below, this will help you to easily restart and debug your application ;
Copy the below image and paste it into your index.js file.
This will create an express server and connect to a MongoDB database.
Package dependencies needed to work alongside our server will be imported and initialized.
Both internal and external middleware needed for our application are also initialized here.
const dotenv = require("dotenv");
dotenv.config();
// require("dotenv").config()
require("express-async-errors");
const express = require("express");
const app = express();
const morgan = require("morgan");
const cors = require("cors");
const mongoSanitize = require("express-mongo-sanitize");
const rateLimit = require("express-rate-limit");
const helmet = require("helmet");
const xss = require("xss-clean");
const mongoose = require("mongoose");
//const { Customer, UserAuth } = require("./Routes");
const Customer  = require('./Routes/customerRoute')
const UserAuth = require('./Routes/userAuthRoute')

// middlewares
app.set("trust proxy", 1);
const limiter = rateLimit({
  windowMs: 15 * 60 * 1000, // 15 minutes
  max: 100, // Limit each IP to 100 requests per `window` (here, per 15 minutes)
  standardHeaders: true, // Return rate limit info in the `RateLimit-*` headers
  legacyHeaders: false, // Disable the `X-RateLimit-*` headers
});
app.use(morgan("tiny")); //only use this in developement
app.use(express.json());
app.use(cors());
app.use(mongoSanitize());
app.use(limiter);
app.use(helmet());
app.use(xss());

// route middleware
app.get("/", (req, res) => {
  res.send("Node-Docker Article");
});
app.use("/api/v1/customer", Customer);
app.use("/api/v1/user", UserAuth);

const port = process.env.PORT || 3000;

// use when starting application locally
let mongoUrlLocal = "mongodb://sa:admin1@127.0.0.1:27017";

// use when starting application as docker container
const mongoUrlDocker = "mongodb://sa:admin1@mongodb";

// connect to mongo database using mongoose
const connectToDB = async () => {
  try {
    await mongoose.connect(mongoUrlDocker);
  } catch (err) {
    console.log(`error connecting db : ${err}`);
  }
};

app.listen(port, () => {
  connectToDB();
  console.log(`app listening on port ${port}...`);
});
Models
Create the following files under the Models folder and paste its accompanying codes.
The structure of the documents is set up in the model
Hooks and methods can also be set up in the model e.g pre-save hook as seen below.
customerModel.js
  const mongoose = require("mongoose");
  const { Schema } = mongoose;
  const { v4: uuidv4 } = require("uuid");

  const customerSchema = new Schema(
    {
      name: {
        type: String,
        required: true,
        maxLength: 500,
        unique: true,
      },
      address: {
        type: String,
        required: true,
        maxLength: 500,
      },
      PhoneNumber: {
        type: String,
        required: true,
        trim: true,
      },

      customerNumber: {
        type: String,
        trim: true,
      },
    },
    {
      timestamps: true,
    }
  );

  customerSchema.pre("save", async function () {
    const UUID = uuidv4();
    const PIN = UUID.split("-");
    const LastNumberPIN = PIN[PIN.length - 1];
    const PIN_NUMBER = `CN-${LastNumberPIN}`;
    this.customerNumber = PIN_NUMBER;
  });

  module.exports = mongoose.model("Customer", customerSchema);
inventoryModel.js
  const mongoose = require("mongoose");
  const { Schema } = mongoose;

  const InventorySchema = new Schema(
    {
      item: {
        type: String,
        required: true,
        maxLength: "200",
        unique: true,
        trim: true,
        required: true,
      },
      itemCode: {
        // 01-115
        type: String,
        required: true,
        maxLength: 6,
        unique: true,
        trim: true,
        required: true,
      },
      cartonUnit: {
        type: Number,
        enum: [6, 12],
        required: true,
      },
      itemVolume: [
        {
          unitOfMeasure: {
            type: String,
            enum: ["Bottle", "Carton"],
            // unique: true,
            trim: true,
          },

          quantity: {
            type: Number,
            trim: true,
            default: 0,
          },
        },
      ],
    },
    { timestamps: true }
  );

  module.exports = mongoose.model("Inventory", InventorySchema);
Controllers
Create the following files under the Controllers folder and paste their associated code;
customer.js
  const { StatusCodes } = require("http-status-codes");
  const Customer = require("../Models/customerModel");

  const createCustomer = async (req, res) => {
    const { name, address, PhoneNumber } = req.body;
    if (!name || !address || !PhoneNumber) {
      return;
    }

    const customerAcc = await Customer.create({ name, address, PhoneNumber });
    res.status(StatusCodes.CREATED).json({ customerAcc });
  };

  const getAllCustomer = async (req, res) => {
    const Allcustomer = await Customer.find({});
    res.status(StatusCodes.OK).json(Allcustomer);
  };

  module.exports = {
    createCustomer,
    getAllCustomer,
  };
inventory.js
const Inventory = require("../Models/inventoryModel");
const { StatusCodes } = require("http-status-codes");
const { BadRequestError, NotFoundError } = require("../Errors");
const createProduct = async (req, res) => {
  const stocks = await Inventory.create(req.body);
  if (!stocks) {
    throw new BadRequestError("Error creating inventory stock");
  }
  res.status(StatusCodes.CREATED).json(stocks);
};

const createSingleProduct = async (req, res) => {
  res.send("createSingleProduct");
};

const getAllProduct = async (req, res) => {
  const stocks = await Inventory.find({});
  res.status(StatusCodes.OK).json({ stocks, count: stocks.length });
};

const getSingleproduct = async (req, res) => {
  const itemId = req.params.id;
  if (!itemId) {
    throw new NotFoundError("stock does not exist");
  }
  const stockItem = await Inventory.findOne({ _id: itemId });
  res.status(StatusCodes.OK).json({ stockItem });
};

const stockHolding = async (req, res) => {
  const holding = await Inventory.aggregate([
    {
      $project: {
        item: 1,
        itemCode: 1,
        itemVolume: { unitOfMeasure: 1, quantity: 1 },
      },
    },
  ]);

  if (!holding) {
    throw new BadRequestError("not found");
  }
  res.status(StatusCodes.OK).json(holding);
};

module.exports = {
  createProduct,
  createSingleProduct,
  getAllProduct,
  getSingleproduct,
  stockHolding,
};
Routes
Routes will be created which will allow the application to listen to requests. Under the Routes folder, create the following files and paste it's accompanying codes.
customerRoute.js
  const express = require("express");
  const router = express.Router();
  const { createCustomer, getAllCustomer } = require("../Controllers/customer");
  const {
    authentication,
    authorization,
  } = require("../Middleware/authenticationMiddleware");

  // router.route("/").post(createCustomer).get(getAllCustomer);
  router
    .route("/")
    .post([authentication, authorization("admin", "user")], createCustomer)
    .get([authentication, authorization("admin", "user")], getAllCustomer);

  module.exports = router;
inventoryRoute.js
  const express = require("express");
  const router = express.Router();
  const {
    createProduct,
    createSingleProduct,
    getAllProduct,
    getSingleproduct,
    stockHolding,
  } = require("../Controllers/inventory");
  const {
    authentication,
    authorization,
  } = require("../Middleware/authenticationMiddleware");

  router
    .route("/")
    .get([authentication, authorization("admin", "user")], getAllProduct)
    .post([authentication], createProduct);

  router.route("/stockholding").get([authentication], stockHolding);
  router
    .route("/:id")
    .post([authentication, authorization("user", "admin")], createSingleProduct)
    .get(getSingleproduct);

  module.exports = router;
userAuthRoute.js
const express = require("express");
const router = express.Router();
const { authentication } = require("../Middleware/authenticationMiddleware");
const {
  registerUser,
  loginUser,
  updateUser,
} = require("../Controllers/userAuth");

router.route("/register").post(registerUser);
router.route("/login").post(loginUser);
router
  .route("/:id")
  .patch([authentication, authorization("admin", "user")], updateUser);

module.exports = router;
Authentication
Using jsonwebtoken and bcrypt packages already installed, set up for the authentication logic with an accompanying authorization logic will be done.
Let's start by creating a userModel.js file under the Models folder, which will have the below code;
const mongoose = require("mongoose");
const { Schema } = mongoose;
const bcrypt = require("bcryptjs");
const jwt = require("jsonwebtoken");
const { NotFoundError, UnauthenticatedError } = require("../Errors");

const validateEmail = (email) => {
  const emailRegex = /^\w+([\.-]?\w+)*@\w+([\.-]?\w+)*(\.\w{2,3})+$/;
  return emailRegex.test(email);
};
const userSchema = new Schema(
  {
    userName: {
      type: String,
      trim: true,
      unique: true,
      required: true,
      maxLength: 15,
    },
    email: {
      type: String,
      required: true,
      unique: true,
      validate: [validateEmail, "Please use a valid email address"],
    },
    password: {
      type: String,
      required: true,
      trim: true,
      maxLength: 15,
      minLength: 6,
    },
    role: {
      type: String,
      enum: ["admin", "user", "storeKeeper"],
      default: "user",
    },
  },
  { timestamps: true }
);

//hash password
userSchema.pre("save", async function () {
  const salt = await bcrypt.genSalt(10);
  const hashedPassword = await bcrypt.hash(this.password, salt);
  if (!hashedPassword) {
    throw new NotFoundError("error hashing password");
  }
  this.password = hashedPassword;
});

userSchema.method("createJWT", async function () {
  const createToken = jwt.sign(
    {
      userID: this._id,
      userName: this.userName,
      email: this.email,
      role: this.role,
    },
    `${process.env.JWT_SECRET}`,
    {
      // expiresIn: `${process.env.JWT_EXPIRES}`,
      expiresIn: "1h",
    }
  );
  return createToken;
});

userSchema.method("comparePassword", async function (userPassword) {
  const isValid = await bcrypt.compare(userPassword, this.password);
  return isValid;
});

module.exports = mongoose.model("User", userSchema);
If you notice, a pre-save hook was created which will hash our password before it's pushed to the database. This a security measure, to prevent public knowledge of our password, especially in situations where the database has been compromised.
A createJWT method was also created, which will generate our token once initiated, and also a comparePassword method, which will compare the user input password against the password the user stored in the database.
Now create a userAuth.js file under the Controllers folder which will handle all authentication requests.
const { BadRequestError } = require("../Errors");
const User = require("../Models/userModel");
const { StatusCodes } = require("http-status-codes");

const registerUser = async (req, res) => {
  const { userName, email, password, role } = req.body;
  const validUser = await User.findOne({ userName });
  //check if username already exist
  if (validUser) {
    throw new BadRequestError("Username already exist");
  }
  //check if email already exist
  const validEmail = await User.findOne({ email });
  if (validEmail) {
    throw new BadRequestError("Email already exist");
  }
  const user = await User.create({ userName, email, password, role });
  if (!user) {
    throw new BadRequestError("error creating user");
  }

  const token = await user.createJWT();
  if (!token) {
    return;
  }
  res.status(StatusCodes.CREATED).json({
    Username: user.userName,
    email: user.email,
    role: user.role,
    token,
  });
};
///user login
const loginUser = async (req, res) => {
  const { email, password } = req.body;
  if (!email || !password) {
    throw new BadRequestError("Prvovide all inputs");
  }
  const validUser = await User.findOne({ email });
  if (!validUser) {
    throw new BadRequestError("user or email not found");
  }
  const isPasswordValid = validUser.comparePassword(password);
  if (!isPasswordValid) {
    throw new BadRequestError("invalid credential");
  }
  const token = await validUser.createJWT();
  if (!token) {
    return;
  }

  res.status(StatusCodes.OK).json({
    name: validUser.userName,
    email: validUser.email,
    role: validUser.role,
    token,
  });
};

//update Password and role
const updateUser = async (req, res) => {
  const { password, email } = req.body;
  const FindUser = await User.findOne({ _id: req.params.id });
  if (!FindUser) {
    return;
  }
  const UpdateUser = await User.findOneAndUpdate(
    { _id: FindUser._id },
    { password },
    { new: true }
  );
  if (!UpdateUser) {
    throw new BadRequestError("user not found");
  }
  res.status(StatusCodes.OK).json({ msg: "update successful" });
};

module.exports = { registerUser, loginUser, updateUser };
As part of the authentication process, we'll create Middlewares to intercept requests and verify the authenticity of such requests. Under the Middleware folder create an authenticationMiddleware.js file with the below code logic;
const { UnauthenticatedError, UnauthorizedError } = require("../Errors");
const jwt = require("jsonwebtoken");

const authentication = async (req, res, next) => {
  const authHeader = req.headers.authorization;
  if (!authHeader || !authHeader.startsWith("Bearer")) {
    throw new UnauthenticatedError("Authentication error");
  }
  const token = authHeader.split(" ")[1];
  try {
    const { userID, userName, email, role } = jwt.verify(
      token,
      `${process.env.JWT_SECRET}`
    );
    req.user = { userID, userName, email, role };

    next();
  } catch (error) {
    throw new UnauthenticatedError("Authentication Failed");
  }
};

const authorization = (...roles) => {
  //The roles is an array of roles ['admin', 'User']
  return (req, res, next) => {
    // console.log(req.user.role, "req.user.role");

    if (!roles.includes(req.user.role)) {
      throw new UnauthorizedError("User is unathorized");
    }
    next();
  };
};

module.exports = { authentication, authorization };
The authentication middleware function above checks the authorization header to confirm a token is present in the request and verify the token's authenticity using jwt.verify(token, secretKey) method.
Then the authorization middleware function above is used to enforce user access control for specified routes.
If you notice there are custom error handlers that were utilized across different files as we built, to throw readable errors to the user. Head to the below GitHub repository for these files, which will be present in the Errors Folder. Replicate all the files seen here i.e error folder into your project errors folder.
Set the below key-value parameters into your .env file ;
JWT_SECRET=inventory/$/£/SecretKey
JWT_EXPIRES=1h
Note, Including all the application controllers will bloat this article, kindly visit the above GitHub link to access all features included in the controllers.
Dockerizing App
Alright, let's get into the real deal. Docker is a way to package applications with all the necessary dependencies and configuration which makes development and deployment efficient.
Before you continue, go to the official Docker page i.e docs.docker.com/desktop, and install the docker engine suitable for your PC. Run the below code on your terminal, if a version is returned, you are good to go.
docker -v
Docker version 20.10.16, build aa7e414
Create a Dockerfile at the root of the application with the following instructions ;
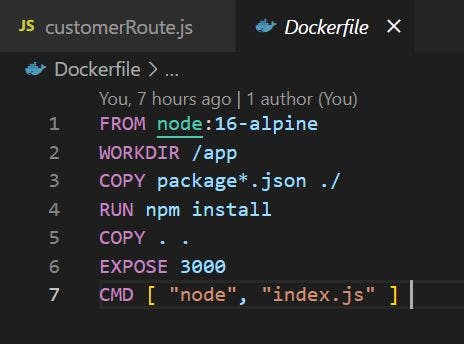
node:16-alpine is the base image on which your desired image will be built on top. Alpine Linux is used here because it is lightweight, which helps transport images from our machine to the other.
WORKDIR /app - This instruction sets the working directory and this directory if it does not exist.
The 3rd and 4th instruction copies the package.json file into the working directory and installs dependencies.
The 5th instruction copies the source files into the working directory of the image.
The 6th instruction exposes the port on which the application will run.
Then finally the 7th instruction starts your application.
Applications do not run in isolation, they need other services such as a database. With the help of docker-compose, which is a tool in docker that helps in running multiple docker containers, all services such as the database which will work alongside the application will run and be managed efficiently.
Now create a Docker-compose.yml file at the root of your application with the following instructions ;
version: "3.9"
services:
  api:
    build:
      context: ./
      dockerfile: Dockerfile
    image: inventoryapi:v1
    environment:
      - PORT=3000
    ports:
      - "3000:3000"
    restart: always
    depends_on:
      - mongodb
  mongodb:
    image: mongo
    restart: always
    environment:
      MONGO_INITDB_ROOT_USERNAME: sa
      MONGO_INITDB_ROOT_PASSWORD: admin1
    volumes:
      - mongodb-data:/data/db
  mongo-express:
    image: mongo-express
    restart: always
    ports:
      - 8081:8081
    environment:
      ME_CONFIG_MONGODB_ADMINUSERNAME: sa
      ME_CONFIG_MONGODB_ADMINPASSWORD: admin1
      ME_CONFIG_MONGODB_SERVER: mongodb
      # ME_CONFIG_MONGODB_URL: mongodb://sa:admin1@mongodb
      # ME_CONFIG_MONGODB_URL: mongodb://sa:admin1@mongodb:27017/
volumes:
  mongodb-data:
    driver: local
Docker-compose partitions the images which helps the application run as services as seen above.
The first service i.e api - is the base image service which is pointing to the Dockerfile as a source of instruction to build its image. It depends on the Mongodb service to start up as seen from its instruction i.e depends_on:mongodb.
The mongodb service is the MongoDB database which your application will be feeding data into.
mongo-express service is a MongoDB interface to view entries or data inflow into the database.
More on docker-compose from the official docs Read more - Docker Compose
Open your IDE terminal i.e vs code**,** and run the below command to start the application.
Docker Commands to start, rebuild and destroy containers
Build and run your application using the below cmd in a detached mood.
docker-compose up -d
Note, every time your make changes to your application file, you have to rebuild the image using the below cmd
docker-compose up -d --build
To tear down or destroy your dockerized application use the below cmd
docker-compose down
          Open postman and run a get request with your base URL i.e http://localhost:3000
          If it returns your response body , your awesome and its working perfectly
Now the dockerized application is running, the routes performing requests on the database need to be tested since public and user-authorized routes exist.
Going ahead with the registration route i.e localhost:3000/api/v1/user/register with its required payload model below;
{
    "userName":"user",
    "email":"user@gmail.com",
    "password":"user747",
    "role":"admin"
}
If a successful response body is returned together with a token, that means a user has been created on the database, and your containers are up and running properly.
Login with the same user you just created using the login route i.e localhost:3000/api/v1/user/login, using the login model payload below and the credential you supplied during registration, a token will be supplied together with user information as well.
{
    "email":"user@gmail.com",
    "password":"user747"
}
You can go further to create a customer, fetch all created customers, and perform other transactions. But since some routes in the application must pass through authentication, a Bearer token needs to be set to allow requests to be sent successfully.
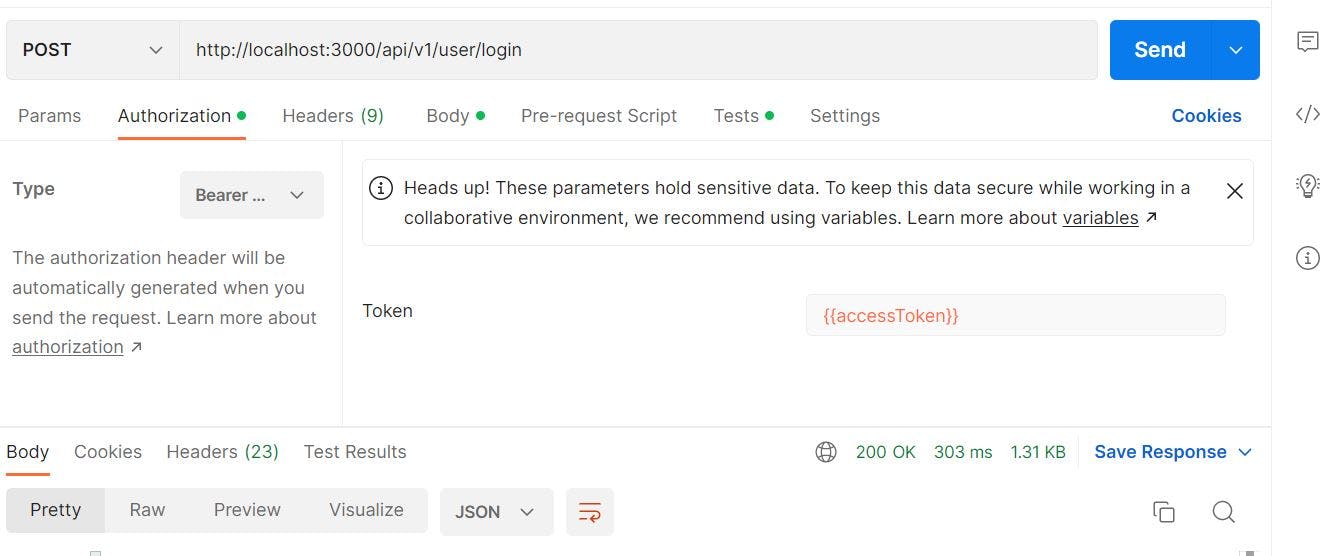
Set Bearer Token automatically on Postman.
An Automatic Bearer token fix will be achieved from the login route on the postman. Select the authorization menu while on the login route interface and set the Token key as {{accessToken}} while making sure the type of authorization selected is Bearer Token, see the image below
With the postman authorization setup done, you can now perform requests for all authenticated routes. You can also run requests for role-based routes, since this was also set up. Ensure role-based request meets with the roles defined in routes if not an error will occur as seen below e.g authorization("admin", "user").
router
  .route("/")
  .post([authentication, authorization("admin", "user")], createCustomer)
  .get([authentication, authorization("admin", "user")], getAllCustomer);
The above is an API route request http://localhost:3000/api/v1/customer - used to create a customer and to get all customers created. It passes through authentication and authorization middleware before the execution of API is done.
Since it's role-based which is triggered by the authorization middleware, it can only be accessed by specified users.
You can also create public API routes that won't pass through any middleware as defined above e.g router.route("/").post(createCustomer).get(getAllCustomer).
Storing Docker Image on Docker Hub
Just like how Github is used to store and share our coding projects, in docker we use docker hub registry to do such.
Signup to docker using the link Docker Hub, note free accounts are limited to a certain number of repositories.
Head back to your project IDE(vs-code), open your terminal, and login into docker using docker login cmd, follow the corresponding prompt with the necessary information i.e username and password.
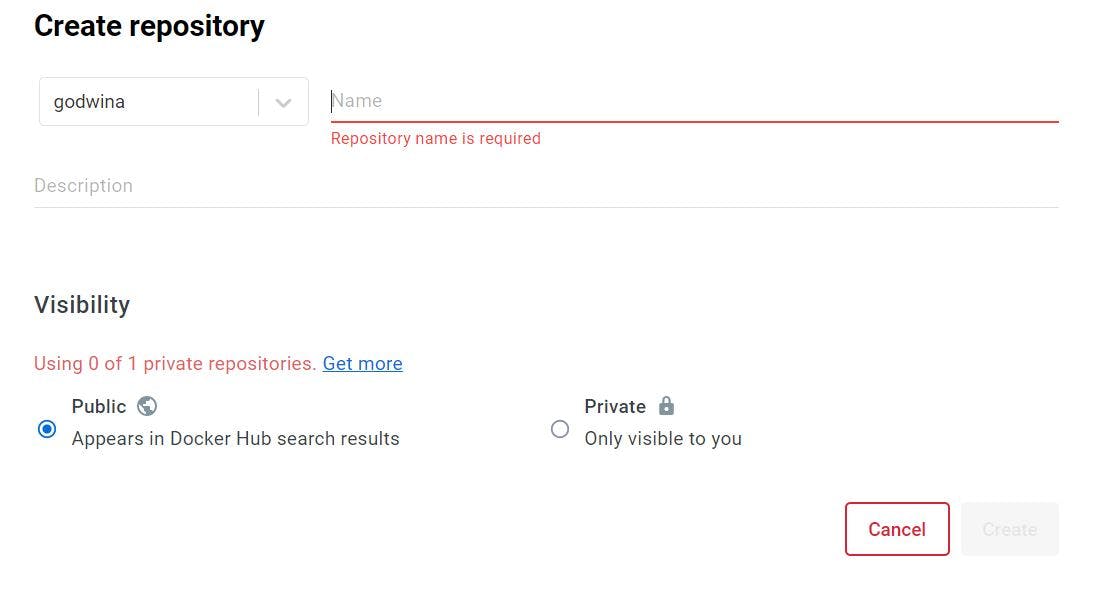
- If login is successful, head back to docker hub, create a repository with a name similar to your current project, and set its visibility to public or private.
- Tag your existing inventoryapi/v1 docker image with a new name using the below cmd, and ensure to replace <your docker username> with your actual docker username.
docker tag inventoryapi/v1 <your docker username>/unit-inventory
Push your docker image using the below cmd,
docker push <your docker username>/unit-inventoryViola, you are all done now, you can check your docker hub with your docker image sitting pretty well there, and can be easily shared.
Wrap-up and further reading in Docker
In this article, you learnt how to build, authenticate and authorize a Node Js application, using express Js, and dockerizing it using docker containers. You also understood the benefit of using docker-compose which is a docker container management tool.
There's a lot more to Docker that can be covered in this article, refer to the official documentation to learn more about best practices in docker, security in docker, and other important topics to use docker effectively.
Thanks for reading!!!, and happy coding.